Programming in RWFMS Version 2 (R2)
===================================
# Introduction
RWFMS (Robert Wagner Formular Management System) is a framework to handle dialog forms as eg widely used in municipality and government agencies.
The basic concept is to represent a form as a JSON-object and add an appropriate workflow to it.
# Client side programming
The task on the client side is to display the form and to allow an user to make entries and trigger events and/or calculations on it. For this four form description areas are used:
* Render
Defines layout of form
* Form
Defines input-areas, form-events and calculations
* Folder
Defines data structure, content and storage
* Process
Defines form workflow
## Rendering a form
By now two Render-objects can be used:
* Render to PDF
* Render to HTML
The usage and syntax is to large extend identical. The HTML-Renderer is used for form-dialog while the PDF-renderer is used to create reports from filled forms.
The Renderer starts at top left of first page and ends bottom right of last page. Every entry gets an own rectangular cell. Multiple cells can form a row where every cell in a row has the same height.
A Renderer can be recursive, i.e. a cell can contain another form-renderer. The following descriptors can be used to fomat a cell:
| Format | Descriptor example | PDF | HTML |
| :--------------- | :---------| :-----: | :-----: |
| align text center | Acenter | Y | Y |
| align text right | Aright | Y | Y |
| Goto X | sX10 | Y | N |
| Goto Y | sY10 | Y | N |
| text style bold | Sbold | Y | Y |
| text style italic | Sitalic | Y | Y |
| text opacity | Sopacity?T=0.2 | Y | Y |
| Border left | B1 | Y | Y |
| Border right | B2 | Y | Y |
| Border top | B4 | Y | Y |
| Border bottom | B8 | Y | Y |
| Border left and bottom (1+8) | B9 | Y | Y |
| Border all (1+2+4+8) | B15 | Y | Y |
| Border auto | B32 | (Y) | Y |
| Fill color | cFill?hex=#f4d9d2 | Y | Y |
| Text color | cText?color=black | Y | Y |
| Draw color | cDraw?r=10&g=10&b=90 | Y | Y |
| Margin left | dX10 | Y | Y |
| Margin top | dY20 | Y | Y |
| font-size | f7 | Y | Y |
| Height | H40 | Y | Y |
| Next row | N | Y | Y |
| Padding auto | pA | Y | Y |
| Padding left 4 and bottom 4 | p?L=4&B=4 | Y | Y |
| Padding right 4 and top 4 | p?T=4&R=4 | Y | Y |
| Text value | Vconst?text=${encodeURI(x\n)} | Y | Y |
| Text value | Vconst?text=4711 | Y | Y |
| Empty cell | Vempty | Y | Y |
| Image | Vimage?path=${encodeURI(./logo.png)} | Y | Y |
| Width | W40 | Y | Y |
## Exercise 1
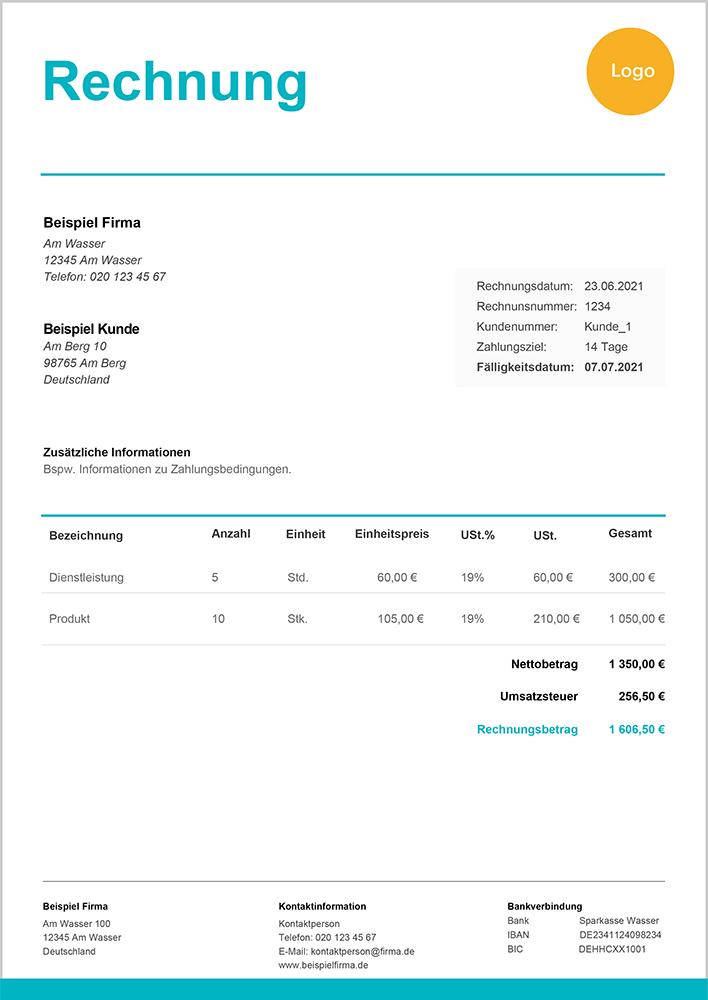
Create an invoice PDF which looks like this template:

**Installation hints**
````bash
npm install --global http-server
start http-server -c-1 -p 3000
http://localhost:3000/index.html?testSample=render&ynTestRender=Y&testRenderType=PDF
https://robert.development.omnia.egovc.de/index.html?testSample=render&
````
## Form-input-areas
The renderer defines cells from top-left to bottom right.
With the following, additional form-descriptions this cells get input areas.
### Form-Element-Group (FEG)
A FEG is a list of Form-Element (FE) descriptors. In most cases each FE describes the content of one cell.
For now we only look at the basic Elements of a FE:
* FE_Prefix: general type of input, e.g. "GenericString"
* FGM_Format: render-description, e.g. "dX1,W23,p?L=1,Vitem,N"
* FGM_Key: the name of the corresponding key in form json data
* FE_Title: corresponds with html-title tag
* yn-Switches: value is either 'Y' (true) or 'N' (false). Control of bahavior, read-access and may more.
````JS
form.setFEG("contact",
{ FE_Prefix: 'GenericString', FGM_Key: 'first_name', FGM_Format: "dY2,dX5,f10,B15,W40,Vitem", FE_Title: Vorname`},
{ FE_Prefix: 'GenericString', FGM_Key: 'USR_LastName', FGM_Format: "dY2,dX5,f10,W40,B15,Vitem,dY10", FE_Title: `Nachname`, SEautoValue: `$profile()` },
{ FE_Prefix: 'GenericString', FGM_Key: 'age', FGM_Format: "dY2,dX5,f10,W40,B15,Vitem,dY10", FE_Title: `Alter`, SEautoValue: `#A;#E;let res=await XRW.api.sendGetAsync("https://api.agify.io/?name="+$.first_name); return res.age;` },
);
````
# Miscellaneous
## Create pages only with HTML- and PDF-Renderer
* adress
* invoice with header
* simple invoice with table
* invoice with image
## Create folder from given JSON
[Example-JSON from Wikipedia](https://en.wikipedia.org/wiki/JSON)
````JSON
{
"first_name": "John",
"last_name": "Smith",
"is_alive": true,
"age": 27,
"address": {
"street_address": "21 2nd Street",
"city": "New York",
"state": "NY",
"postal_code": "10021-3100"
},
"phone_numbers": [
{
"type": "home",
"number": "212 555-1234"
},
{
"type": "office",
"number": "646 555-4567"
}
],
"children": [
"Catherine",
"Thomas",
"Trevor"
],
"spouse": null
}
````
* "adress"
````JS
this.formMain.setFEG("address",
{ FE_Prefix: 'GenericString', FGM_Key: 'street_address', FGM_RPos: "dY2,dX5,f10,W40,V", FE_Title: `Strasse` },
{ FE_Prefix: 'GenericString', FGM_Key: 'city', FGM_RPos: "dX2,f10,W40,V", FE_Title: `Ort` },
{ FE_Prefix: 'GenericString', FGM_Key: 'state', FGM_RPos: "dX2,f10,W30,V", FE_Title: `Staat` },
{ FE_Prefix: 'GenericString', FGM_Key: 'postal_code', FGM_RPos: "f10,W20,N, dY10", FE_Title: `PLZ` },
);
````
* "phone_numbers" as spawn-sub-forms
* full form
## Create form from folder
* adress form
* add "phone_numbers" as spawn-sub-forms
* full form
## Create application with menu-bar and list-boxes
## Test applications with Cypress
ToDo: generate Cypress script from "Editor"
````CMD
npm install cypress --save-dev
````